

This tutorial does use the ScanNCut machine (as that is what I have), but you can also use any other digital paper cutter, or, of course, take a bit longer and do it all by hand with a scalpel.
The other week I made some Barbie sized bunting to display in the background of a photoshoot I did for the There’s Always Another Doll blog. The photoshoot displayed ‘Happy New Year’, and I also made up a few others that will be used later in the year for other celebrations.
A few people had commented to me about the bunting so I thought I’d make up a quick tutorial on how I made it.
At the end of the tutorial there’s also a link to my Etsy shop where you can buy the ScanNCut files (.fcm files) if you can’t make them yourself, or don’t wish to (there’s 3 different bunting styles and 14 different sayings, plus alphabet so you can make your own words)

What you need:
- Coloured card, two or more colours
- Double sided tape (optional)
- Craft glue
- 3mm (1/8”) wide ribbon
- ScanNCut machine
- ScanNCut bunting files

Making the ScanNCut files:
The Bunting shape: To make the bunting design for the ScanNCut I used Adobe Illustrator.
Making a triangle that is 22mm (7/8”) wide and 20mm (6/8”) tall.
Then above the triangle add a rectangle that is the width of the triangle (22mm-7/8”) and the height is the height of your ribbon.
I then drew an outline around the triangle/rectangle so it is one shape rather than two (if the ScanNCut sees the file as two shapes it will cut the shapes separately leaving you with a separated triangle and rectangle).
Example of the bunting shape (with measurement detail) below:-

The Letters: When you’re choosing the letters you are using on the bunting, I’ve found it’s better to choose fairly bold letters. The letters you cut will be quite small and sometimes the ScanNCut machine has trouble with thinner flowing letters.
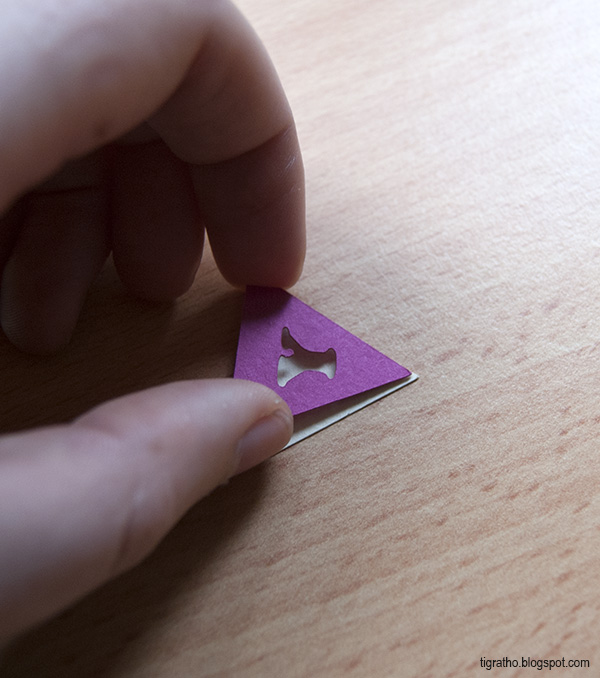
Make sure when placing your letters you keep the each letter inside the triangle area. If you place your letters too high you risk having them covered by the ribbon. As you can see in my first attempt I accidentally placed the heart too high in the triangle and almost cut off the top.

Make sure all your letters fit; with this font I chose an A and a W as they were the widest letters at the top and the bottom (respectively). I had to test different sizes to make sure they both fit in the triangle without being too close to the edges.
Once you’ve chosen the size of your letters, type out the word you want to have your bunting to say and ‘Convert to Outlines’ (if you’re using Illustrator).
Place each letter inside its own triangle. Make sure the top of each letter is the same distance from the top, and centred within the triangle.
You could cut out the letters individually (rather than within the bunting) and stick them on to each blank piece of bunting, but I’ve created it this way for two reasons:
1. It makes them a lot easier to stick on, as you have a bit more space to use your tape or glue.
2. All your letters will be in the same placement on each piece of bunting, so you don’t need to worry about making sure you’ve lined the top of each letter up properly.
Also create a blank bunting shape (with no letter or shapes in the centre), as well as the bunting with letters.
Then save your file as a .svg, import it into the ScanNCut Canvas website and save it as an .fcm onto your USB. Then import it onto your ScanNCut machine.
Cutting the bunting:
First decide what colours you want to use:
I chose a light cream colour and contrasting bright colours to make my buntings, and experimented with how I used the colours.
Here’s the outcome for each one to give you an idea what each style looks like.
Cream bunting with multicoloured text (my favourite)

Cream bunting with each word in a specific colour (I don’t think the yellow letters were enough contrast for a whole word)

Coloured bunting with cream text (which looks very cute and stands out more).

Once you’ve imported the files onto your ScanNCut machine you can cut out what you need from your coloured card.
Open the file up with your saying (I'm using Happy Valentines Day for this example) and cut out the letters from the pink card.
Then open up your blank triangle shape, highlight the piece and choose the ‘edit piece’ button. Change the number to 20 (this will create 20 triangle backings, one for each letter and both the hearts), and cut from the light cream card.
The bunting letters will be the colour of the blank bunting pieces and the bunting colour will be the colour of the bunting that has the letters cut out (as that will go over the top of the blank bunting piece, making the letter show the colour underneath).

Once you have all your bunting pieces cut out, stick some double sided tape (or craft glue) on the back of each bunting piece that has the letters cut out.

Then stick them onto the blank bunting shape, lining up the edges.
I have chosen to use double sided sticky tape here as I work with it a lot and find it quicker to cut/stick and don’t have to wait for it to dry.
Now you can stick the ribbon to the top which will complete your bunting.

I originally used double sided sticky tape at the top of each bunting piece and stuck it to the ribbon, but possibly because the ribbon I used was metallic; it stuck for a little while but didn’t like being moved around a lot. After a while I swapped to craft glue, which worked a lot better and hasn’t come apart yet.
I’ve left a small gap between each bunting letter piece in each word, and a slightly larger gap between each word. I didn’t measure this, just went with what looked visually pleasing while I was making it.
I also left a length of blank ribbon at each end so it can either be stuck with blutac (like in the photos) or tied around something to hang it up.
If you don’t want to make the ScanNCut files I have a digital download for sale in my Etsy shop.
The download includes the triangle bunting from this tutorial, as well as two different flag shaped buntings and wording for:
Happy Birthday
Happy New Year
Happy Valentines Day
Merry Christmas
Happy Australia Day
Happy 4th July
Congratulations!
Party Time!
Happy Halloween
Happy St Patricks Day
Happy Easter
Happy Thanksgiving
Its a Girl!
Its a Boy!
as well as blank bunting pieces, the alphabet, numbers and a few extra shapes (!,?, heart, star and Christmas tree)
And of course, even though they are initially barbie sized, you can enlarge them once they are on your ScanNCut and use them for larger dolls.
I haven’t done it myself, but you can probably also reduce the size for smaller dolls. Physically you can reduce the size in the ScanNCut machine; I’m just not sure how well it would cut all the letters at a much smaller size.


Great tutorial. Thanks for all the help with that blog post. I hope you inspire lots more dolly parties and celebrations.
ReplyDeleteThank you and no worries, it was fun :)
Delete